-
이미지 처리-5 이미지 혼합이미지 처리 2023. 6. 19. 18:17
1. 이미지 확인, 가중치 혼합
sample_img = cv2.imread("../picture/download1.jfif")
sample_logo = cv2.imread("../picture/download2.png")

sample_img = cv2.cvtColor(sample_img, cv2.COLOR_BGR2RGB)
sample_logo = cv2.cvtColor(sample_logo, cv2.COLOR_BGR2RGB)


plt.imshow(sample_img)
plt.show()

plt.imshow(sample_logo)
plt.show()

혼합에 사용할 이미지를 두 장 불러오고 잘 불러져 왔는지 확인한다.
img1 = cv2.resize(sample_img, (800,600))
img2 = cv2.resize(sample_logo, (800,600))

blended = cv2.addWeighted(img1, 0.5, img2, 0.5 , 0)

plt.imshow(blended)
plt.show()
이미지의 크기를 같은 크기로 resize 하고 cv2.addWeighted 함수로 이미지를 혼합한다. 가중치를 0.5, 0.5를 주면 각각의 이미지가 동일한 비율로 혼합된 것을 확인할 수 있다.
2. 이미지 붙이기
small_img = cv2.resize(img2,(200,200))
plt.imshow(small_img)

x_offset = 40
y_offset = 170

x_end = x_offset + small_img.shape[1]
y_end = y_offset + small_img.shape[0]

img1[y_offset:y_end, x_offset:x_end] = small_img

plt.imshow(img1)
plt.show()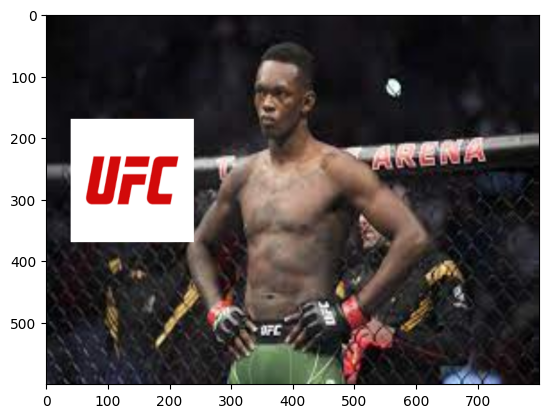
로고 이미지를 작게 리사이즈한 후 x, y_offset에 띄울 값을 할당해서 x, y_end 좌표를 생성하고 이미지를 붙인다.
3. 로고 이미지 배경 제거
small_img_gray = cv2.cvtColor(small_img, cv2.COLOR_RGB2GRAY)

ret, mask1 = cv2.threshold(small_img_gray, 120, 255, cv2.THRESH_BINARY)

plt.imshow(small_img_gray, 'gray')
plt.show()

plt.imshow(mask1,'gray')
plt.show()
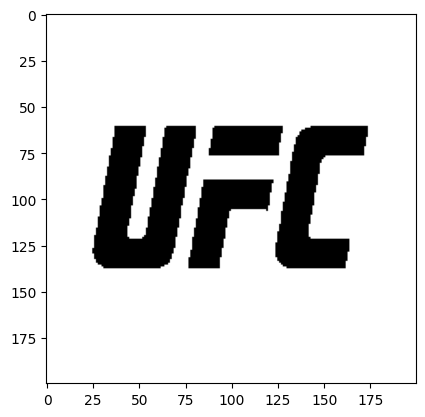
이진화를 하기 위해 그레이 스케일로 변환하고 이미지를 이진화한다. 육안으로는 검은색으로 보이지만 실제로는 0 값이 아닐 수도 있으므로 확실히 이진화를 하여 0 값을 얻는다. 실제로 이진화를 실행해보면 글자의 경계부분이 매끄럽지 않게 나타나는데 이것은 이진화 전의 그레이 스케일 이미지가 완벽한 0과 1의 값을 가지지 않았다는 것을 증명한다.
roi = resize_img[y_offset:370,x_offset:240]

bg = cv2.bitwise_or(roi,roi, mask = mask1)

plt.imshow(bg)
plt.show()
붙여 넣을 이미지 영역을 (240,370)의 크기로 잘라주고 cv2.bitewise_or 함수로 이진화된 이미지와 잘라낸 이미지의 or 연산을 실행한다. or 연산을 실행하면 두 이미지의 0과 1 영역을 더하기 연산하여 글자가 있는 부분이 확실하게 검은색으로 표시된다.
mask_inv = cv2.bitwise_not(small_img_gray)

plt.imshow(mask_inv, 'gray')
plt.show()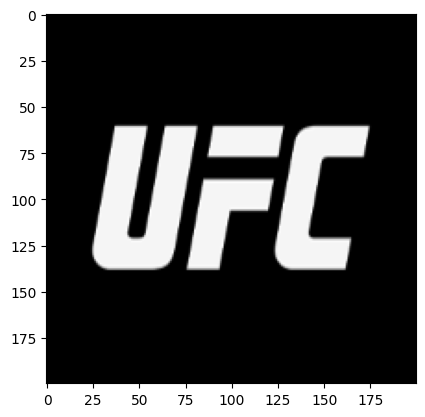
and 연산을 수행하기 위한 영역을 구하기 위해 not 연산을 실행한다. not 연산은 0과 1을 반전시킨다.
fg = cv2.bitwise_and(small_img, small_img, mask=mask_inv)
plt.imshow(fg)
plt.show()
원본 로고이미지에 반전시킨 값을 mask 영역으로 지정하여 and 연산을 실행시키면 글자가 있는 부분을 제외한 영역은 모두 검은색, 즉 0 값으로 만들어준다.
final_roi = cv2.add(bg, fg)
plt.imshow(final_roi)
plt.show()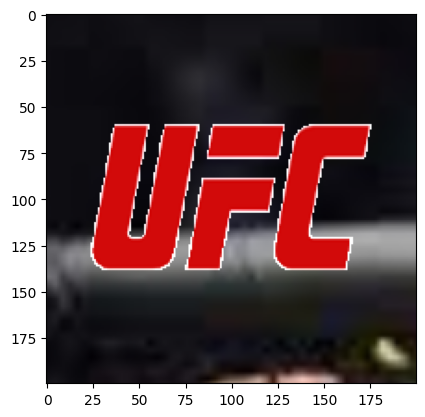
이제 두 이미지를 합쳐서 로고 글자가 배경에 정확하게 삽입되도록 할 수 있다.
4. 로고 이미지와 원본 이미지 혼합
small_img = final_roi
resize_img[y_offset: y_offset + small_img.shape[0], x_offset : x_offset + small_img.shape[1]] = small_img

plt.imshow(resize_img)
plt.show()
마지막으로 원본 이미지와 합쳐서 로고의 배경을 제거하고 자연스럽게 글자가 삽입된 이미지를 얻을 수 있다.
'이미지 처리' 카테고리의 다른 글
이미지 처리-7 객체 추적 (0) 2023.06.19 이미지 처리-6 기본 동영상 처리 (0) 2023.06.19 이미지 처리-4 얼굴 이미지 회전 (0) 2023.06.19 이미지 처리-3 번호판 (2) 2023.06.18